
Showing App Volumes Application Attach Progress to Users with PowerShell
Omnissa App Volumes is a great solution for separating applications from the base Windows image. Instead of installing every application directly into a golden image, applications can be packaged separately and dynamically attached to a virtual desktop when required.
This approach is especially useful in non-persistent Omnissa Horizon environments, where keeping the Windows image as clean and generic as possible simplifies image maintenance considerably. App Volumes packages can be assigned to users or groups and attached to the virtual desktop as part of the user logon process.
There is, however, one small user-experience problem.
After the Windows desktop appears, App Volumes might still be busy attaching applications.
From an administrator perspective this is completely normal. From an end-user perspective it can be confusing.
The Start menu is already available, Explorer is running, and the desktop looks ready for use. However, some applications might still be missing because their App Volumes packages have not finished attaching yet if the on-demand option is not used.
In this blog post, I will show how I used a PowerShell script to monitor the App Volumes attachment process directly from the Windows registry and display a small graphical progress window to the user.
The solution runs completely in user context, does not require administrative privileges, and does not depend on access to the App Volumes Agent log files.
The Use Case
The environment where I implemented this solution consists of Windows 11 non-persistent Omnissa Horizon virtual desktops with Omnissa App Volumes 2512.
Applications are dynamically provided through App Volumes instead of being installed directly in the Windows image.
During logon, Windows itself can become usable before App Volumes has completed processing all application packages.
This can result in a situation like this:
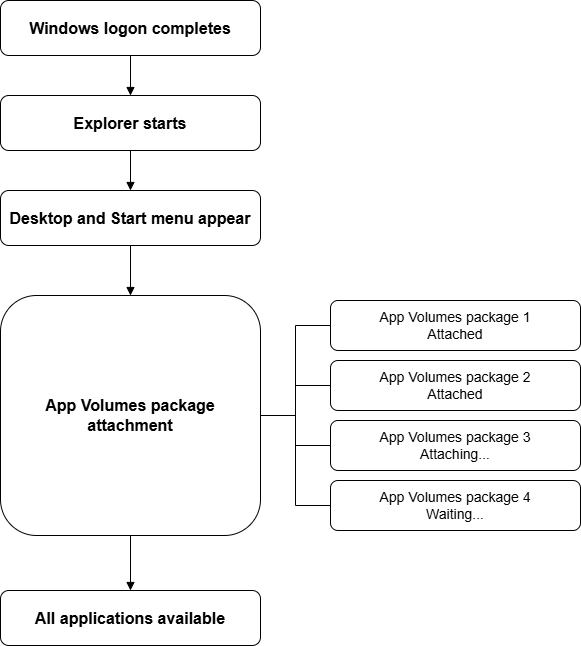
This means that simply detecting an attached VMDK or checking Get-Disk is not necessarily a good indication that the application is ready for the user.
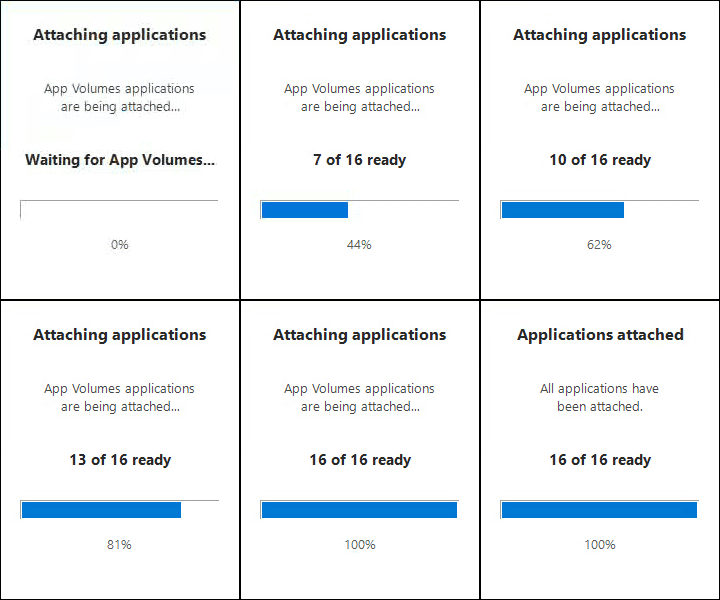
What I wanted instead was something like this:
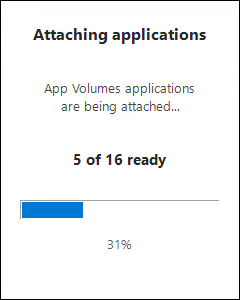
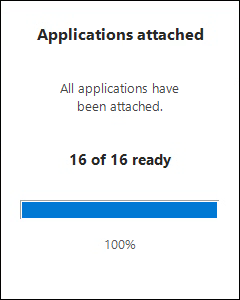
The window automatically disappears after two seconds.
Using AppTracker to Determine the App Volumes Status
The main challenge was finding a reliable way to determine when App Volumes had actually finished attaching the applications.
Reading the App Volumes Agent log was not an ideal solution because the progress window must run completely in the logged-on user’s context. I also did not want to change permissions on App Volumes log files just to provide a progress indicator.
While investigating App Volumes 2512, I found a much more useful registry location:
HKLM\SOFTWARE\Omnissa\AppVolumes\AppTracker
App Volumes creates subkeys underneath AppTracker for the applications it is processing.
For example:
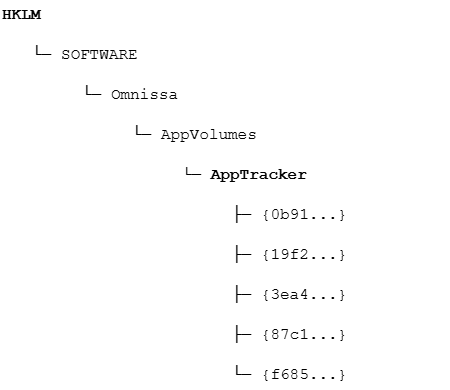
Each entry contains a Status value.
Monitoring these values during logon showed that the applications initially appeared with:
Status = 1
and changed individually to:
Status = 3
as App Volumes completed processing them.
Eventually every AppTracker entry had:
Status = 3
In one of my tests, 16 App Volumes entries were processed and the complete sequence took approximately 22 seconds.
This immediately gave me the information required for a progress indicator:
|
1 2 3 4 5 6 7 8 9 10 11 12 13 14 15 16 17 18 19 20 21 22 23 24 |
$Apps = @( Get-ChildItem ` 'HKLM:\SOFTWARE\Omnissa\AppVolumes\AppTracker' ` -ErrorAction SilentlyContinue ) $Ready = 0 $Pending = 0 foreach ($App in $Apps) { $Data = Get-ItemProperty ` -Path $App.PSPath ` -ErrorAction SilentlyContinue if ($Data.Status -eq 3) { $Ready++ } else { $Pending++ } } |
The percentage can then simply be calculated using:
|
1 2 3 4 5 |
$Percentage = [math]::Round( ($Ready / $Apps.Count) * 100 ) |
So when 11 of 16 applications are ready, the graphical window can display:
11 of 16 ready 69%
Important: I have not found public Omnissa documentation that defines the numeric AppTracker\Status values. Status = 3 representing the completed state is therefore based on testing and observation with App Volumes 2512. I recommend validating this behavior again after upgrading the App Volumes Agent.
The Complete Script
Putting these pieces together results in the following PowerShell script:
|
1 2 3 4 5 6 7 8 9 10 11 12 13 14 15 16 17 18 19 20 21 22 23 24 25 26 27 28 29 30 31 32 33 34 35 36 37 38 39 40 41 42 43 44 45 46 47 48 49 50 51 52 53 54 55 56 57 58 59 60 61 62 63 64 65 66 67 68 69 70 71 72 73 74 75 76 77 78 79 80 81 82 83 84 85 86 87 88 89 90 91 92 93 94 95 96 97 98 99 100 101 102 103 104 105 106 107 108 109 110 111 112 113 114 115 116 117 118 119 120 121 122 123 124 125 126 127 128 129 130 131 132 133 134 135 136 137 138 139 140 141 142 143 144 145 146 147 148 149 150 151 152 153 154 155 156 157 158 159 160 161 162 163 164 165 166 167 168 169 170 171 172 173 174 175 176 177 178 179 180 181 182 183 184 185 186 187 188 189 190 191 192 193 194 195 196 197 198 199 200 201 202 203 204 205 206 207 208 209 210 211 212 213 214 215 216 217 218 219 220 221 222 223 224 225 226 227 228 229 230 231 232 233 234 235 236 237 238 239 240 241 242 243 244 245 246 247 248 249 250 251 252 253 254 255 |
$Path = 'HKLM:\SOFTWARE\Omnissa\AppVolumes\AppTracker' Add-Type -AssemblyName System.Windows.Forms Add-Type -AssemblyName System.Drawing # ------------------------------------------------------------ # FORM # ------------------------------------------------------------ $form = New-Object System.Windows.Forms.Form $form.Size = New-Object System.Drawing.Size(240,300) $form.FormBorderStyle = 'None' $form.BackColor = 'White' $form.TopMost = $true $form.ShowInTaskbar = $false # Draw a 1-pixel black border around the window $form.Add_Paint({ param($sender, $e) $borderPen = New-Object System.Drawing.Pen( [System.Drawing.Color]::Black, 1 ) $e.Graphics.DrawRectangle( $borderPen, 0, 0, ($sender.ClientSize.Width - 1), ($sender.ClientSize.Height - 1) ) $borderPen.Dispose() }) # Bottom-right, 10 pixels above the taskbar $workingArea = [System.Windows.Forms.Screen]::PrimaryScreen.WorkingArea $form.StartPosition = 'Manual' $form.Location = New-Object System.Drawing.Point( ($workingArea.Right - $form.Width - 10), ($workingArea.Bottom - $form.Height - 10) ) # ------------------------------------------------------------ # TITLE # ------------------------------------------------------------ $title = New-Object System.Windows.Forms.Label $title.Location = New-Object System.Drawing.Point(15,20) $title.Size = New-Object System.Drawing.Size(210,30) $title.Text = 'Attaching applications' $title.TextAlign = 'MiddleCenter' $title.Font = New-Object System.Drawing.Font( 'Segoe UI', 12, [System.Drawing.FontStyle]::Bold ) $title.ForeColor = [System.Drawing.Color]::FromArgb(40,40,40) $title.BackColor = 'White' $form.Controls.Add($title) # ------------------------------------------------------------ # STATUS TEXT # ------------------------------------------------------------ $statusLabel = New-Object System.Windows.Forms.Label $statusLabel.Location = New-Object System.Drawing.Point(15,70) $statusLabel.Size = New-Object System.Drawing.Size(210,55) $statusLabel.Text = "App Volumes applications`nare being attached..." $statusLabel.TextAlign = 'MiddleCenter' $statusLabel.Font = New-Object System.Drawing.Font( 'Segoe UI', 10 ) $statusLabel.ForeColor = [System.Drawing.Color]::FromArgb(70,70,70) $statusLabel.BackColor = 'White' $form.Controls.Add($statusLabel) # ------------------------------------------------------------ # COUNTER # ------------------------------------------------------------ $counterLabel = New-Object System.Windows.Forms.Label $counterLabel.Location = New-Object System.Drawing.Point(15,140) $counterLabel.Size = New-Object System.Drawing.Size(210,40) $counterLabel.Text = 'Waiting for App Volumes...' $counterLabel.TextAlign = 'MiddleCenter' $counterLabel.Font = New-Object System.Drawing.Font( 'Segoe UI', 11, [System.Drawing.FontStyle]::Bold ) $counterLabel.ForeColor = [System.Drawing.Color]::FromArgb(40,40,40) $counterLabel.BackColor = 'White' $form.Controls.Add($counterLabel) # ------------------------------------------------------------ # PROGRESS BAR # ------------------------------------------------------------ $progressBar = New-Object System.Windows.Forms.ProgressBar $progressBar.Location = New-Object System.Drawing.Point(20,200) $progressBar.Size = New-Object System.Drawing.Size(200,20) $progressBar.Minimum = 0 $progressBar.Maximum = 100 $progressBar.Value = 0 $progressBar.Style = 'Continuous' $form.Controls.Add($progressBar) # ------------------------------------------------------------ # PERCENTAGE # ------------------------------------------------------------ $percentageLabel = New-Object System.Windows.Forms.Label $percentageLabel.Location = New-Object System.Drawing.Point(15,230) $percentageLabel.Size = New-Object System.Drawing.Size(210,30) $percentageLabel.Text = '0%' $percentageLabel.TextAlign = 'MiddleCenter' $percentageLabel.Font = New-Object System.Drawing.Font( 'Segoe UI', 10 ) $percentageLabel.ForeColor = [System.Drawing.Color]::FromArgb(90,90,90) $percentageLabel.BackColor = 'White' $form.Controls.Add($percentageLabel) # ------------------------------------------------------------ # DISPLAY WINDOW # ------------------------------------------------------------ $form.Show() [System.Windows.Forms.Application]::DoEvents() # ------------------------------------------------------------ # APP VOLUMES MONITORING # ------------------------------------------------------------ $ReadySince = $null while ($true) { $Apps = @( Get-ChildItem $Path -ErrorAction SilentlyContinue ) $Ready = 0 $Pending = 0 foreach ($App in $Apps) { $Data = Get-ItemProperty ` -Path $App.PSPath ` -ErrorAction SilentlyContinue if ($Data.Status -eq 3) { $Ready++ } else { $Pending++ } } # -------------------------------------------------------- # UPDATE GUI # -------------------------------------------------------- if ($Apps.Count -gt 0) { $Percentage = [math]::Round( ($Ready / $Apps.Count) * 100 ) if ($Percentage -gt 100) { $Percentage = 100 } $progressBar.Value = $Percentage $counterLabel.Text = "$Ready of $($Apps.Count) ready" $percentageLabel.Text = "$Percentage%" $statusLabel.Text = "App Volumes applications`nare being attached..." } else { $counterLabel.Text = 'Waiting for App Volumes...' $percentageLabel.Text = '0%' $progressBar.Value = 0 } [System.Windows.Forms.Application]::DoEvents() # -------------------------------------------------------- # DETECT ALL APPLICATIONS READY # -------------------------------------------------------- if ( $Apps.Count -gt 0 -and $Pending -eq 0 ) { if ($null -eq $ReadySince) { $ReadySince = Get-Date } # All applications must remain Status 3 for 1 second if ( ((Get-Date) - $ReadySince).TotalMilliseconds -ge 1000 ) { break } } else { $ReadySince = $null } Start-Sleep -Milliseconds 100 } # ------------------------------------------------------------ # COMPLETED # ------------------------------------------------------------ $progressBar.Value = 100 $title.Text = 'Applications attached' $statusLabel.Text = "All applications have`nbeen attached." $counterLabel.Text = "$Ready of $($Apps.Count) ready" $percentageLabel.Text = '100%' [System.Windows.Forms.Application]::DoEvents() # Keep success message visible for 2 seconds $timer = [System.Diagnostics.Stopwatch]::StartNew() while ($timer.Elapsed.TotalSeconds -lt 2) { [System.Windows.Forms.Application]::DoEvents() Start-Sleep -Milliseconds 50 } $form.Close() $form.Dispose() |
Running It During User Logon
For this use case, the script should be started as part of the interactive user logon process.
In an Omnissa Horizon environment, Dynamic Environment Manager is an obvious place to launch it, but a user logon script or scheduled task can also be used.
I recommend starting PowerShell with the console hidden:
powershell.exe -ExecutionPolicy Bypass -WindowStyle Hidden -File "AppVolumesProgress.ps1"
The script itself does not require elevation. It only reads the AppTracker information from HKLM and displays the Windows Forms interface in the user’s session.
Conclusion
In a non-persistent Horizon desktop, Windows being ready does not necessarily mean that all dynamically delivered applications are ready.
That distinction can be confusing to users. The Start menu is available and the desktop looks usable, but App Volumes can still be attaching applications in the background.
By monitoring:
HKLM\SOFTWARE\Omnissa\AppVolumes\AppTracker
the PowerShell script can provide useful feedback about what is actually happening instead of displaying an arbitrary timer.
The result is a lightweight solution that:
- runs completely in user context;
- requires no administrative privileges;
- does not require access to the App Volumes Agent logs;
- shows actual attachment progress;
- supports different application assignments per user;
- and automatically disappears when the applications are ready.
One final consideration is that AppTracker and the meaning of Status = 3 should be regarded as implementation details observed with App Volumes 2512 and the script tested in a Horizon VDI (single user) desktop, rather than a documented automation interface. I therefore recommend validating the behavior again after future App Volumes Agent upgrades.
For this particular use case, however, it provides exactly the information needed to make the final part of a non-persistent VDI logon much more transparent to the user.
It would be even better and very useful to have visible feedback during the attachment process available to the user as a native built-in option in the App Volumes agent. But who knows what the future brings 😉.